Items filtered by date: Monday, 07 December 2015
World Wide Telephone Adapters
This diagram shows you visual chart of what a particular countries phone adapter looks like.

Centre Floats
These techniques all center floats, they do not replace the floats with other code like some people suggest. All of these methods dont seem to need to have the widths set, if you run into problems you might consider setting the widths of the child elements (ie the ones that are floated).
display: table Method
Optional Title
Content Here
Optional Title
Content Here
Width set to 150px
Optional Title
Content Here
Optional Title
Content Here
No set width
<div class="float-parent" style="display: table; margin: auto; border: green 3px solid;">
	<div style="float: left; margin: 5px; width: 150px; border: blue 3px solid;">
		<h3>Optional Title</h3>
		<p>Content Here</p>
	</div>
	<div style="float: left; margin: 5px; width: 150px; border: blue 3px solid;">
		<h3>Optional Title</h3>
		<p>Content Here</p>
	</div>
</div>
This is my prefered method and uses the least amount of code. The way it works is display: table; make the browser treat the immediate children as Table cells so the floats actuall only occur within the table cell.The table is then centered with margin: auto; .
position:relative Method
CSS Code
<style type="text/css">
	#centered-float-menu {
		float: right;
		position: relative;
		left: -50%;
		border: green 3px solid;
	}

	#centered-float-menu ul {
		position: relative;
		left: 50%;
		border: yellow 3px solid;
	}

	#centered-float-menu li {
		float: left;
		border: blue 3px solid;
	}
</style>
HTML Code
<div id="centered-float-menu">
	<ul>
		<li><a href="#">Link 1</a></li>
		<li><a href="#">This is long...</a></li>
		<li><a href="#">Link 3</a></li>
		<li><a href="#">www.myexampledomain.com</a></li>
		<li><a href="#">Link 5</a></li>
	</ul>
</div>
This relative method is a work around but does do what it says on the tin and might be useful when the preferred method does not work.
text-align: center; and inline-block Method
<div style="text-align: center; border: green 3px solid;">
	<div style="display: inline-block; border: yellow 3px solid;">
		<div style="float: left; margin: 2px; border: blue 3px solid;">Link 1</div>
		<div style="float: left; margin: 2px; border: blue 3px solid;">Link 2</div>
		<div style="float: left; margin: 2px; border: blue 3px solid;">Link 3</div>
	</div>
</div>
This method does maintain the floats, it is not like other tutorials where they instruct you to replace the floats with the inline-block centre method.
Links
- Faking 'float: center' with Pseudo Elements | CSS-Tricks
- Centre widthless floats | CSS examples - relative/inline
- How to horizontally center a floating element of a variable width? - Stack Overflow - relative/table
- How do I center float elements? - Stack Overflow - relative/table
- How do I center align a div that contains floated elements? - Stack Overflow - inline
- Centering Floats | CSS PLAY - relative/table - i am guessing, code is CSS based and no in thepage to look at.
- You Can't Float Center with CSS | Code it Pretty
- How To Center Floating elements | CSS Tip - relative - excellent code example in codepen
- CSS – Horizontally center a row of floated elements | upshots - relative - Simple code example
- How to Center Floated Divs in a Container , How to Center a Floating div - margin: auto; - This shows you how to centre a single floated <div>
- Centering Floats |WebmasterWorld - inline-block - this shows you how to centre floats by turning the float container into an inline-block but the floats are maintained.
j2.5 to 3.1.1 - Menu SQl errors - after jupgrade (solution)
This is a backup of my forum post/article from Joomla! • View topic - j2.5 to 3.1.1 - Menu SQl errors - after jupgrade (solution)
These instructions assume you have correctely prepped your joomla 2.5.11 install and are still having issues. (ie you have upgrade your extensions and removed those which are not compatable with j3.x etc...)
The Error
Due to the different variations of installed components, you might not see the exact error below but one very similiar.
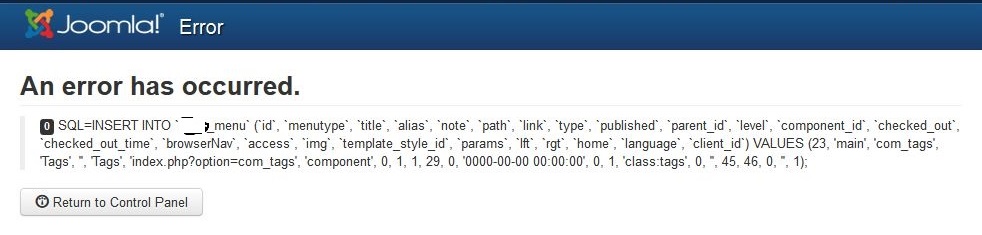
0 - An error has occurred.

SQL=INSERT INTO `jos_menu` (`id`, `menutype`, `title`, `alias`, `note`, `path`, `link`, `type`, `published`, `parent_id`, `level`, `component_id`, `checked_out`, `checked_out_time`, `browserNav`, `access`, `img`, `template_style_id`, `params`, `lft`, `rgt`, `home`, `language`, `client_id`) VALUES (23, 'main', 'com_tags', 'Tags', '', 'Tags', 'index.php?option=com_tags', 'component', 0, 1, 1, 29, 0, '0000-00-00 00:00:00', 0, 1, 'class:tags', 0, '', 45, 46, 0, '', 1);
This is another possible error message

The upgrade from j2.5.11 can be a difficult one if you arrived at j.25 via a migrated j1.5.x joomla install. the reason is that for some reason the jupgrade did not correctely migrate menu (or other possibly) id's correctely.
when you do a fresh install off joomla 2.5.11 the menu items up to 200 are reserved for future joomla menu updates for the core. No user content starts until id 201. The user created menus or in this case the demo data start at 201. some versions of joomla possibly start this at id 100
now in my case there is no gap between the core and the user data menu ids (ie i have some user menus in the 0 - 200 range) and this can rear its head when you do an upgrade because the guys at joomla expect 0-100 or 0- 200 to be empty so issues like the on i have do not happen and they can put their stuff in there.
one way of detecting this error without diving into the database is the lack of the joomla update component menu in the admin panel. You can correct this missing item by following this article -insert link-- but it will delete the menu item that is already there. If you know what you are doing just look in jos_menu and see if the range 0-200 only has joomla core stuff in it.
now my issue is when the update has almost finished it says there is a duplicate entry, in my case it is a jmedia menu item
solution:
It is the menu items that causes the upgrade issue for me.
later version of j2.5 made all new 'user content' menu items install in the jos_menu id 200+ region so this will never be an issue, but for those of use who have migrated from joomla 1.5 with jupgrade to an early version of j2.5 (early versions of jupgrade had issues in migrating menu id numbers), here is the fix
The errors in the database need fixing. But you can sucessfully upgrade to joomla 3.0.3 and then make the changes. I believe that it is after j3.0.3 the 'joomla extension' and 'joomla core' quick icon items are added. However i would make the changes to the j2.5.11 first. This note is really for reference for those on j3.0.3 having similiar issues and apart from the obvious the fix is still the same.
Pre-requisites
- backup, backup, backup etc..
- upgrade your joomla 2.5 to the latest version, should be 2.5.11 at the time of writing this
step 1 - copy all of you menu's (only those below 200)
NB:
- there is a batch copier at the bottom of the menu page
- move keeps the same id, only top level seems to get the number on the end)
How To:
- create a new menu for each of the menus you need to copy the menus (via menus tab) i just add a 'c' at the begining menutype of the menu alias so no duplicates are created
- filter the menu to copy at the top
- make sure 'display all' is set
- select all the shown menu items
- go to the batch thing at the bottom (of menu items tab)
- select the new target menu, a blank one that begins in your 'c'- now copy the menu
- keeping 1 windows open with the list of menus, open the module manager and fiter by type, selecting menu
- edit each affected module (by editing the old menu module posistion just on the right of each menus entry) and swap from the old menu to the new 'c' menu
- once done check the new menus are working as they should
- if one of the affect menus is default, make sure to swap this aswell
- some of the menus items will get a 2 added on to them (to prevent duplicate alias). you will have to remove this manually
- delete the old menus from menu manager and make sure they are removed out of trash aswell
- now all the menus from below 200 should be removed
- in the databse you might have some menu items that were not deleted properely at some point in the past and should be removed via phpmyadmin (only if you know what you are doing)
- reassign all menu modules that have been affected to their new menu's (ie the ones with 'c' in front)
- delete the old menus (to avoid confusion)
- remove the letter 'c' from the beginning of the new module names (the menu and mosule will still be linked)
- rename the new modules to remove the word copy out of thier name etc..
Remaining Steps
- perform the joomla updater component fix
As mention before the joomla updater might be missing. To fix this you need to run the following sql script to add the entery back in. You by now should have an empty 0 - 200 menu id range. This is correcting one of those damaged enteries.
info from
https://www.akeebabackup.com/documentation/troubleshooter/atj25update.html
http://docs.joomla.org/Joomla_Update_Missing_in_from_Admin_Menu
- additional missing menu items.
I checked the menu items on a fresh install of joomla 2.5.11 and discovered that core menu items go up to 22. (i think in later version of j3 tags is added in at id 23)
I had a missing item, Smart Search. here is the code i used to fix the missing item:
INSERT INTO `j25_menu` (`id`, `menutype`, `title`, `alias`, `note`, `path`, `link`, `type`, `published`, `parent_id`, `level`, `component_id`, `ordering`, `checked_out`, `checked_out_time`, `browserNav`, `access`, `img`, `template_style_id`, `params`, `lft`, `rgt`, `home`, `language`, `client_id`) VALUES
(21, 'menu', 'com_finder', 'Smart Search', '', 'Smart Search', 'index.php?option=com_finder', 'component', 0, 1, 1, 27, 0, 0, '0000-00-00 00:00:00', 0, 0, 'class:finder', 0, '', 41, 42, 0, '*', 1);
the quickest way to get code like this is to use phpmyadmin to export them from a fresh copy of joomla j2.5.11
- now perform the upgrade to 3.1.1
- check database is correct and inspect your content
- file you j2.5.11 backup somewhere safe
- backup your new j3.1.1 site
- file you j3.1.1 backup somewhere safe
- click on the clear cache (i admin) link to allow the new admin menu to come properely
- done
If the update icons are missing on the dashboard. this is because the plugins need to be enabled. on a default 3.0 install they are enabled by default.
Go to the plugin manager and enable:
- Quick Icon - Joomla! Update Notification
- Quick Icon - Joomla! Extensions Updates Notification
Final Thought
You possibly need to reinstall a component over the top if you get issues. i did, in particular k2. i had updated it to the latest version before upgrade (cannot uninstall it because it wipes the database)
Mosets Tree - Correct the address format for the UK
Mosets Tree is written with US addresses in mind so when you want to use an UK address format you need to make a few minor adjustments to your template to alter the display order of the fields that build up the address. This will not affect storage of these details in your database, just how they are shown. You can also alter the display order of the fields in the admin section to make it also match the UK address format.
Solution
Alter the files in your template as follows. As you can see you are only changing the display order of some fields which then give yout he correct UK address format.
sub_listingSummary.tpl.php
foreach( array( 4,5,6,7,8 ) AS $address_field_id )
to
foreach( array( 4,5,6,8,7 ) AS $address_field_id )
and
($this->config->getTemParam('displayAddressInOneRow','1') && !in_array($field->getId(),array(4,5,6,7,8))
to
($this->config->getTemParam('displayAddressInOneRow','1') && !in_array($field->getId(),array(4,5,6,8,7))
sub_listingDetails.tpl.php
foreach( array( 4,5,6,7,8 ) AS $address_field_id )
to
foreach( array( 4,5,6,8,7 ) AS $address_field_id )
Mosets Tree - Category changer not working with the description field WYSIWYG enabled
The Problem
These instructions relate to Mosets Tree 3.5.8
When I used the category changer with the WYSIWYG enabled on the description field, the WYSIWYG content would get removed and the Save/Save and Close/Cancel buttons would no longer work.
My Original Thoughts
These might not be the cause or a working solution to solve the problem permanetly and leave mosets tree functioning 100%.
Cause
- when the fields are refresh via jQuery after clicking the update button the WYSIWYG editor is re-intialised when the fields are re-written. The previous instance of the WYSIWYG is still active so what happens is a second instance of the WYSIWYGis initialised causing errors on page and primarily causes the wysiwyg not to work, probably because of a conflict. Not verified this.
- therefore this is definately caused by the WYSIWYG being triggered twice and then the resulting conflict rather than the DOM refresh persay.
Solution
- the solution is simple, you need to terminate the previous wysiwyg via jquery/javascript before wiping and then reloading the fields. This prevents conflicts and when the new intialisation command (wherever it is) for the wysiwyg is fired only 1 instance of the editor is then active on the page allowing it to work correctly.
- it should be noted when you terminate the wysiwyg any alterations that have been made by the editor have been effectively saved in the changes it has made to the DOM, the editor basically interprets what is there and when you makes changes it saves the code as needed to stay in the DOM.
Addendum
- The description is not mandatory so you could use a javascript check to see if the WYSIWYG is present in both the current and target category and if it is do not cycle this field
Communication with Mosets Tree
1 - My first Communication of the error on the Demo Site
There is a fault with your demo site.
I enabled wysiwyg for front and back end. i then edited a listing in the admin and changed its category. Once I changed the category and clicked update, the WYSIWYG content
disappears and a lot of stuff on the page stops working. I am using the latest version of firefox.
1 - Response from Mosets Tree
Thanks for your e-mail and feedback. This is indeed and known issue due to a limitation on Joomla's raw output the last time we checked. Because of this, we recommend our users to use non-wysiwyg editor (this is the default behaviour) or go directly to the category when you need to create a listing for it. We will keep an eye on this and provide a fix once that is possible.
Best regards,
CY Lee
2 - Issue raised with Mosets Tree with further information
All seems well until you change the category, the WYSIWYG content window is then emptied and the save/save and close/cancel buttons no longer function.
If you do not change the category the save/save and close/cancel buttons still work and the WYSIWYG content is preserved.
2 - Response from Mosets Tree
Thanks for the feedback. This is indeed a known issue to us when you have WYSIWYG editor and change category why editing your listing. It’s due to the fact that we use Joomla’s API to load the wysiwyg editor and there is no way to reactive it after a DOM refresh. We don’t have a solution for this now other than advising you to move the listing to another category before editing it - or don’t use wysiwyg editor if changing category during editing is a frequently used operation on your end.
We’re holding out for a more robust API from Joomla’s end so that we can resolve this. Sorry about the trouble Jon.
Best regards,
CY Lee
3 - An email with my research to help fix the issue
I have done some research into this issue and I don’t believe it is to do with the DOM refresh.
Using joomla 3.4.1
In category.js the error is related to the following code
	html = items.join('');

	jQuery('#mtfields div[id^="field_"]').remove();
	jQuery(html).appendTo('#mtfields');
	jQuery('#mtfields input, #mtfields select, #mtfields textarea').bind('change', function(event) {onChangeMTFieldsInput(event);});
I have messed around with the code briefly and got the wysiwyg to work. These commands occur after the DOM refresh (I think).
Please find attached my research which you might find useful and hopefully a quick fix.
3 - Response from Mosets Tree
That portion of codes are responsible of actually updated the list of fields with a new set of fields of the newly selected category. It doesn’t solve the issue itself but does work if your work case does not require updating the set of fields (i.e.: all your category uses the same set of fields and you only need to update your category).
Best regards,
CY Lee
My Code Research
- The following is my research to try and fix this issue.
- All the following relate to the file:
example.com/media/com_mtree/js/category.js
with the following i changed the category.js and clicked update, and then save. i also used tinymce
html = items.join('');

jQuery('#mtfields div[id^="field_"]').remove();
jQuery(html).appendTo('#mtfields');
jQuery('#mtfields input, #mtfields select, #mtfields textarea').bind('change', function(event) {onChangeMTFieldsInput(event);});
I removed the above code and checked:
- category changer works
- save changes to categories
- joomla buttons work
- changes to the wysiwyg are saved
html = items.join('');
i removed the above code and:
- category changer works
- joomla buttons dont work
- all of the page below the selector disappears
jQuery('#mtfields div[id^="field_"]').remove();
I removed the above code and:
- category changer works
- save changes to categories
- joomla buttons work
- changes to the wysiswy do not get saved
jQuery(html).appendTo('#mtfields');
I removed the above code and:
- category changer works
- joomla buttons dont work
- all of the page below the selector disappears
jQuery('#mtfields input, #mtfields select, #mtfields textarea').bind('change', function(event) {onChangeMTFieldsInput(event);});
I removed the above code and:
- as soon as i hit update it wipes the wysiwyg
- changes are not saved
- category changer works
- joomla buttons do not work
Conclusion
Altering the following code allows you to use the WYSIWYG for the desctiption field and keep the save/save and close/cancel buttons to still work whilst creating records but does have the side effect that
That portion of codes are responsible of actually updated the list of fields with a new set of fields of the newly selected category. It doesn’t solve the issue itself but does work if your work case does not require updating the set of fields (i.e.: all your category uses the same set of fields and you only need to update your category).
Best regards,
CY Lee
The rought translation of the quote is that when you change category Mosets Tree will change the field list to match the new category, there might or might no be a change in the fields used. This code makes those changes. If like me you are using the same fields in all of your categories then removing this code will have not detrimental effect.
The Fix
Open the file
example.com/media/com_mtree/js/category.js
and find the code block
	html = items.join('');

	jQuery('#mtfields div[id^="field_"]').remove();
	jQuery(html).appendTo('#mtfields');
	jQuery('#mtfields input, #mtfields select, #mtfields textarea').bind('change', function(event) {onChangeMTFieldsInput(event);});
	});
and then REM the block out as follows
	/*html = items.join('');

	jQuery('#mtfields div[id^="field_"]').remove();
	jQuery(html).appendTo('#mtfields');
	jQuery('#mtfields input, #mtfields select, #mtfields textarea').bind('change', function(event) {onChangeMTFieldsInput(event);});*/
	});
I would now make sure Mosets Tree works as you expect before massive data entry.
Configure Mosets Tree to be like Bookmarks
what I have done to mosets tree to set it up like Bookmarks.
General Notes
- delete unwanted categories ie demo data
- enable search plugin
- installed Grabmeta Plugin
Mods
These are changes to system files and are not user setable.
Template Mods
- copied default template to 'bookmarks'
- added shrink the web code in to sub_listingSummary.tpl.php (link lists)
- added some css to the image to make shrink the web webshots obey left/righ, template.css line 445 added .listing-summary span.image img , line 453 added .listing-summary span.image-left img
- added shrink the web code in to sub_listingDetails.tpl.php (link details - details view style 1 only), almost the same as sub_listingSummary.tpl.php
Core Mods
- updated corewebsite field to match the mweblink custom field as having 2 fields was pointless. this also allowed me to still use the core field databse table.
- after installing the new corewebsite field, i opened up its config page and resaved it so all the new parameters are saved/present
Settings
These are user setable settings in the Mosets Tree Backend.
Template Settings
- make sure Bookmarks is set as the default template (this could also be put in core settings)
- X Listing Name's link destination - set to Listings Website (new window) - controls what the titles link goes to - if you want to use the advanced features of my new coreweblink (or mweblink) you must not use this for external linking as only the visit counter will work. there is no option for plain URL link (ie must be counted via internal redirect)
- set 'Listing Name's link destination' back to details page, all features of mosets point to this including joomla 'search'.
- Show image --> no
- Number of subcategories = All
Core Settings
- enable wysiwyg for description - frontend (MT configuration/Main/Use WYSIWYG Editor in front-end Description field)
- enable wysiwyg - backend (MT configuration/Main/Use WYSIWYG Editor description field in back-end)
- turn all stripping html off on description field before input, set all to no - I might of changed my mind on this
- * show rating template or config
- RSS - disable (for now)
- * SEF URLs - unsure
- Who can suggest listing = none
- Who can suggest category = none
- Show rating = no
- Who can make a rating = none
- enable the Visited Filed in 'Summary View', i also added it into 'details View'
- enable search plugin and have it to search listings and categories
- configuration/Admin/Explorer's Tree Level set to 10 - this setting limits by default to 4 layers deep.
Category Settings
- make sure you apply the bookmarks template to all children
- make sure root category uses the index template
- Allow listing submission = no
- set only the following fileds to be used name/description/website/visited)
To Do
- * make mosets tree seach nested (like my K2 one)
- * add shrink the web to details view.
- * make details 'title' link to the website via internal link?
My Mosets Tree Notes
General Mosets Notes
General
- records are currently refered to as links, this is confusing and should renamed to records (or the like)
- i dont think moset tree has an intro text box (can be added) but will rather rely on 'read more'
the way mosets tree gets around multiple directories is as follows
- each entry has all fileds created for it in the mysql database (only applies to core fields)
- only those fileds that are visible in that section are then populateed when an entery is created/updated
- the availability of the stored vaules will be determined by the category/section the entry is moved to
- by all field existing you can easily move an entery anywhere in mosets tree
- there must be coding that still allows fileds with nothing to be shown safely
- when you creae a custom filed all enteries will recieve it whther they can access it or not
Template
Notes
- root categories can overide all global settings
- when applying a new template make sure you set apply this to all sub catgegories to make things run as you expect (ie all child cats using the same template)
Link Building
this seems to be an internal plugin that builds <a> tags
$this->plugin( 'ahreflisting', $link, $link_name->getOutput(2), '', array("edit"=>false,"delete"=>false), 1 );
Accessing field data in the template
// these do similiar things i think
$website = $link_fields->getFieldById(12);	// for core and custom, only returns if the feld is active. this loads the 12th field
$website = $link->link_website;			// for core only, always returns the vaule no boolean or permissions. link_website is a core table field/column from #__mt_links
ie. the code below checks to see if the website field is available and then if it is does it have a vaule, if both are positive then run code
// Website
$website = $link_fields->getFieldById(12);
if(!is_null($website) && $website->hasValue()) { echo '<p class="website">' . $website->getOutput(2) . '</p>'; }
Use Main Index template page' options is set by default to on
When creating a new category in back end, the 'Use Main Index template page' options is set by default to on, this should be set to off by default.
Fix
- edit the file
administrator/components/com_mtree/models/forms/category.xml
- search for COM_MTREE_USE_MAIN_INDEX_TEMPLATE_PAGE which is (COM_MTREE_USE_MAIN_INDEX_TEMPLATE_PAGE="Use Main Index template page" from administrator/language/en-GB/en-GB.com_mtree.ini)
- change default="1" option to default="0"
- upload the new XML file and ovewrite administrator/components/com_mtree/models/forms/category.xml
- update the database with SQL if you need to - I am not sure this is required for anything
Fields
fields && classes
- where does the filedtypes configuration get saved = - paremeters, - standard has own table
- can i just update the core weblinks = yes
- how does a coreplugin know how to use the core link database = it is decides by the class name and possible the file names aswell of the field type
- moset fields are installable (nb anything can be made installable with an xml, it is just moserts made them all nice)
- when writing a new field is there a particluar order the functions should go in
- a lot of code duplication, there is no need for field code to be in the mField class, it should all be exported to the fields themselves.
- this basically has all the shared functions in classes for the fields - D:\Documents\websites\lancast\htdocs\administrator\components\com_mtree\mfields.class.php
- a validator Var is usually created by a field, i.e. var $dataValidator = 'validate-url'; is echo'ed for a javascript to set the type of filed validation, this is set in the <input> tag. the validation is set in that particular fileds class in a function
- how does a field decide wheather to create a new custom field entry in the database or use the core fileds already there - class name and filename
- change a field type between a custom and a core field - you can change a field to and from a core filed by changing its name, changing the mysql database column 'iscore' bit in the field's row, and make/delete a new column in #__mt_links table
mweblink
- mweblink does not show spider or go button because the setting is missing in the config
- mweblink has incorrectely used getValue() for a userlookup. i think i will change this to getAccess
- mweblink custom field should be merged with website
- mweblink is missing spider link parameter? and this is why it is not showing
- mweblink - is missing hideprotocoloutput setting in the xml file, this also has not been properely been implemented in mweb
- to use the core table weblink filed basically i just need to update the code of that field. it will automatically change the strage location of the data. so no major re-do. i could in theory just rename mweblinks and overite the already present files and that would do the trick.
- copying all the functions down from 'root' will make altering the plugin much easier. no 100% nessaray but easier.
- i should copy all of the functions required into my new field and make a note of the ones i replicate.
field class example - mweblink
- class mFieldType_mweblink extends mFieldType_weblink = the fields class and is found in mweblink.php
- mFieldType_weblink - is found in htdocs\administrator\components\com_mtree\mfields.class.php, and is what i would class as the root class. this class is also extended by coreweblink
- a general class note: basically if the function is in the clas that is doing the extending, that function is used. if the function is not present, the function in the class that has been extended (call it the parent!!) is used. This is a general class thing but should be remembered.
mtree.php
D:\Documents\websites\lancast\htdocs\administrator\components\com_mtree\mtree.php
- this is an important file, it controls how fields are handled
- search for mFieldType - line 1066 (custom) and 1106 (core)
- line 1184 loads all values for that record, both core and custom.
- line 691 (# Load all CORE, published and assigned custom fields)
- it basically checks to see if there is a table in the core field table that matches the class name (mFieldType_weblink - mFieldType_ = weblink)
- the namimg of the class and files names is important to its feature. you could easily add a new core field by creating a new table in the core files bit and then a new plugin
creating a CF value (custom field)
line 5320 - D:\Documents\websites\lancast\htdocs\administrator\components\com_mtree\mtree.php
table structure
id
cf_id
link_id
value
attachment - Default = 0
counter  - Default = 0
therefore only the first 4 things are created with values
Custom Fields
- only core fields are stored(have their own column) in #__mt_links
- custom fields link to links by this by link_id and cf_id (for the custom filed)
- custom link values are stored in #__mt_cfvalues
- custom fields 'custom' config settings are stored in #__mt_customfields 'params' field.
- All the mandatory settings for a field have their own column in this table (#__mt_customfields).
- This table (#__mt_customfields) does both core and custom fields. It is also where you can set the 'iscore' bit
- you cannot install (via joomla installer) a new field as a core plugin as there seems to be no switch or method to create a new column in the #__mt_links table
- you can update a core plugin either via joomla update (potentialy because you install fields via joomla extension manager and tehre is a <update> field in the fields xml)
- when you have overitten a core field with your new code, you must open the fields config and save changes so the parameters that are stored then match up
- it is only wise to alter a core field if the stored data is going to be the same, just how you handle it is different.
- core field values might only be created when an entry is made rather than when the entry is saved
Creating a Joomla Plugin
This tutorial is based on my GrabMeta Editor Button Plugin which I developed for myself. These instruction will be very similiar for a content plugin which I will address any differences at the end.
There are different types of plugins and I will list the ones I have created:
- editors-xtd - GrabMeta - This is also known as an editor button. The editor-xtd buttons are the buttons that are below the WYSIWYG and are independant of the WYSIWYG. When you press one of these buttons are pressed it executes code usually with the end result of content getting pasted into the WYSIWYG, but not always.
- content - ExecuteCode - These plugins are run in the background during the page rendering process. The basic premisis is that they parse the page ($doc) and alter the text as per the plugins code. The new page is then passed tot he next plugin. These plugins tend only to affect the frontend page renders so the changes they make do not appear in the administrator section.
- search - K2 Extended Search - A search plugin allows you to return results for the joomla search page
General Plugin
Basic Plugin File structure
/grabmeta/language/
/grabmeta/language/en-GB/
/grabmeta/language/en-GB/en-GB.plg_editors-xtd_grabmeta.ini
/grabmeta/language/en-GB/en-GB.plg_editors-xtd_grabmeta.sys.ini
/grabmeta/grabmeta.php
/grabmeta/grabmeta.xml
/grabmeta/index.html
/grabmeta/script.php
Plugin General Notes
- when you zip up the file, it does not matter if all the file inside are inside 1 folder deep
- for constructing a package (multiple extensions in 1 zip) see pkg_hs_highlighter_1.0.12
- the plugin type can be derived from the folder name it sits in
- TinyMCE plugin is great for plugin field types
- Javascript does not like to be spread out over multiple lines so make sure you payload is all on 1 line.
- If I POST to another file rather thand self, the javascript modal closers no longer work and the payload is not inserted. This must be because either the chain broken or the DOM reference is now incorrect.
Language
- Language file naming conventions and precedence - http://docs.joomla.org/Specification_of_language_files
- if you make a <description> to long it will create a link (in the plugin config) that says see full description and this takes you to the full description tab (which is also created to accommodate the full description)
- a description has the html stripped out when used for the main config page and also in plugin lists etc.. in the joomla control panel, it is also truncated
- upon installation the description, which is taken from en-GB.plg_editors-xtd_grabmeta.sys.ini description has the html stripped out, it is also truncated
- there might be a way of {adding a readmore} to a description
- when just using local language overrides the plugin will not be translated elsewhere in joomla ie plugin manager. PHP and JTEXT calls will still get translated
- in the plugin folder, if you create a language folder and then put a language folder and file (specific to the language you are wanting to translate) in there it will overide the current language settings if you select that language. you do not need to set this file in you xml file. This is good for development as it prevents the need for you to keep re-installing the plugin to get the updated translations or having to edit those in the joomla system folders
/grabmeta/ language/en-GB/en-GB.plg_editors-xtd_grabmeta.ini
It should be noted that I think if there are translation files in the joomla system folders they might take priority over the local override files
- en-GB is the default language for joomla
- you must reference a language file with <language> tag so the language files get installed to the appropriate joomla language folders
- there are 2 main places for the language files to be installed, other than a local overide folder.
/administrator/language/en-GB/ en-GB.plg_editors-xtd_grabmeta.ini
/administrator/language/en-GB/ en-GB.plg_editors-xtd_grabmeta.sys.ini
- the filename of the language determine where it goes
- the sys file - en-GB.plg_editors-xtd_grabmeta.sys.ini - is the one that is required for outside plugin text translation
- when specifying the language ini files, upon installation of the plugin, these files are moved
- the xml file does not need to be indluded in the file references when you are using local language overide, but does for ini files that are getting installed.
- language files are only referenced in the <languages> tag
- when a language file is referenced in the xml (and thus installed correctely) you can have it any folder within your install package and it will allow translations.
- en-GB.plg_editors-xtd_grabmeta.sys.ini controlls language for installation/lists external to the plugin ie plugin manager
- en-GB.plg_editors-xtd_grabmeta.ini - controll most of the language, it can either be installed site wide in /administrator/language/en-GB/ or used as a local overide file in the plugin {plugin folder}/language/en-GB/ en-GB.plg_editors-xtd_grabmeta.ini
- look at the file name of the ini file, it is important otherwise your translations will not work
- if you do no specifiy the correct plugin group in the language file, it will not load. ie 'editors-xtd' in en-GB.plg_editors-xtd_grabmeta.sys.ini
en-GB.plg_editors-xtd_grabmeta.sys.ini
- en-GB – file language
- plg – type of extension
- editors-xtd – plugin type
- .sys – if this is present the file is a system language file
Example language file references
<languages>
    <language tag="en-GB">language/en-GB/en-GB.plg_editors-xtd_grabmeta.ini</language>
    <language tag="en-GB">language/en-GB/en-GB.plg_editors-xtd_grabmeta.sys.ini</language>
</languages>
- This example is using the local language override folders, you do not have to use these but it allows the installation success message (description from en-GB.plg_editors-xtd_grabmeta.sys.ini) to be displayed.
- The tag="en-GB" denotes what language the files belong to and thus where they should be installed, not the file path of the files. So en-GB =
/administrator/language/en-GB/
- I have seen <languages folder="path/to/language"> but I am not sure of the purpose of this, it seems redundant now
- You can use any folder location for language files as long as they are referenced correctely in your xml file. A lot of people use /language/ and put all the languages in here in one list
Sort these:
- <folder> in plugins xml copies the whole folder and child files etc..
- all videos has 2 tabs + description is fine <field set> creaes a new tab i think
- a system plugin does not depend on a oncontentprepare() call. so this allows maipulation anywhere
- the group=”” name can be gotton from the list of plugins in joomla via the plugin manager
Plugin Type Specific
editors-xtd (Editor Buttons)
Notes specific to an editor button, not address above should as the button calling code.
Button Function Examples
There are some slightly different ways to execute code via the editor button.
Single Stage PHP
- http://mrgott.com/joomla/17-how-to-create-joomla-editors-xtd-plugin-button-and-open-modal-popup
- The button when pushed loads a PHP file in a modal
- The PHP file builds a form that has a javascript function in the button in the form
- The content is submitted directly into the WYSIWYG
GrabMeta (AJAX /Multi Stage PHP)
- Then buton when pushed loads a PHP file
- This PHP file is has a form on it which you input data
- When the form is submitted, the code is submitted back tot he PHP form for further processing
- The results are then pasted into the WYSIWYG
Straight Button
- A javascript is run directly from the button
- no outside files or resources are use outside of the button script file (grabmeta.php)
Straight Button with Modal
- A javascript is run inside a modal
- no outside files or resources are use outside of the button script file (grabmeta.php)
Passing Variables
Whereever your active code is run from, you sometimes need to pass variables or information to it. There are 2 basic ways of doing that in Joomla:
- $_GET style variables (Via the Button URL) - These variables would be incorporated in to the button URL when the page is built so no interaction is possible with the data on the page. The primary use of this is to allow the plugin to read the settings from its config page to build an appropriate URL which will then performs the task to which it has been configured for.
- Joomla database lookup - This would be used when you are loading a PHP script. This method allows completely independant data handling from the button. I have used this to lookup another plugin's settings and perform tasks appropriately. With this method you do not need to pass variables with $_GET from the button but it does take a little more setting up. You should use the Joomla Database Model (API) to read the information from the databse, but you can use a direct method of accessing the database if you wanted (only if you are desperate).
Content Plugin Specific
I will address the differences that are required for a content plugin
Language files
<languages>
    <language tag="en-GB">language/en-GB/en-GB.plg_content_executecode.ini</language>
    <language tag="en-GB">language/en-GB/en-GB.plg_content_executecode.sys.ini</language>
</languages>
As you can see the plugin type aspect fo the file name has changed, and in this case the name of the plugin. You can have 2 plugins, one button and one content with the same name such as 'executecode'.
XML file
- the file name will now be executecode.xml
- There are references in the XML file that will be different
Shrink The Web images not showing
No thumbnails showing can be caused by issues at shrink the web, check the log files there and make sure you have the correct settings.
- API keys and then put in the joomla component
- Added the allowed ip / domains
- If on a shared server, do you have the access to use the server's IP
Links
- Today images are not showing | shrinktheweb
- ShrinkTheWeb Modify Account Security, Distributed API, and Allowed Referrer Settings - shared ip addresses are not supported, but not if you are the first to reserve the IP of the shared server.
This is probably a noobie question so i will warn you guys first but i am a bit stuck. I have had a look about and i do not know what to ask for except here.
I have installed projectfork and installed the PF Menu module. I am using SEF (native not extension). All the links are as follows
http://www.mysite.com/dashboard
http://www.mysite.com/projects
etc..
As you can see they are all root links, but i would like them like
http://www.mysite.com/projectfork/dashboard
http://www.mysite.com/projectfork/projects
On the docs site, the menus on the left do exactly this.
http://projectfork.net/docs
Are all the docs menus actually part of the main menu or is there a joomla trick i can use ie hidden menu item to get all the PF module menu to have 'normal' links?
Solution
Install Projectfork
Make the following changes:
PF Menu
Main Menu
PF Menu Module
You have now configured all your PF links to be under the directory projectfork.
Overview
This solution is not for when you have joomla into a sub-directory because, left as standard the same issue would arise but just in a sub-folder.
My method allows me to have all my projectfork links in the projectfork subfolder. With the standard install of PF and joomla, the PF Menu Module Links are all root items. I wanted my in a subfolder as if i had installed a seperate piece of software whilst everything else was kept route.
This probably arises because i will be using my website for more that PF.
Maybe the solution i have done above might be common Joomla stuff but i found it tricky. I did not even know about joomla 'Menu Alias Item' until today.